How-tos
The tasks buyers come back for, each answered in steps, Blueprint first and C++ after where both apply. They build on the quickstart’s field and pond and the words in Concepts.
Hand the harvest to your inventory
The plugin keeps no inventory of its own. It asks yours, through the Farm Inventory interface, to take in what is harvested and caught and to give up seeds and fertilizer as they are used. Implement it on the player’s pawn, controller or PlayerState, whichever holds your inventory; the plugin looks in that order, on the server.
- Open that Blueprint, click Class Settings in the toolbar, and under Interfaces click Add beside Implemented Interfaces. Pick Farm Inventory and compile.
- In the My Blueprint panel, under Interfaces, double-click Add Farm Item. Its event comes with Item Id, Count and Quality. Add that many of the item to your inventory. Quality is 0 to 2 for a crop, and the size in whole cm for a fish. The event can’t refuse: the crop is picked, and the fish landed, whether your inventory has room or not.
- Double-click Consume Farm Item, which is a function with a Return Value. If your inventory holds Count of Item Id, take them out and return true; otherwise return false. False refuses the planting or fertilizing, and the HUD says No seeds or None left.
- Give the player something to plant: add a few
TurnipSeedsto your inventory when play starts.
The item ids are the assets’ own: a crop hands out its Item Id (Turnip) and takes its
Seed Item Id (TurnipSeeds), a fish hands out its Item Id (Bluegill), and fertilizer is
the Farmer Component’s Fertilizer Item Id (Fertilizer).
#include "FFInventory.h"

UCLASS()
class AMyCharacter : public ACharacter, public IFFInventory
{
    GENERATED_BODY()

    virtual void AddFarmItem_Implementation(FName ItemId, int32 Count, int32 Quality) override
    {
        Items.FindOrAdd(ItemId) += Count;
    }

    virtual bool ConsumeFarmItem_Implementation(FName ItemId, int32 Count) override
    {
        int32* Held = Items.Find(ItemId);
        if (!Held || *Held < Count) { return false; }
        *Held -= Count;
        return true;
    }

    TMap<FName, int32> Items;
};
[!NOTE] Without an implementation, seeds and fertilizer are unlimited and nothing is handed out. The Farmer Component’s On Harvested and the Fishing Component’s On Fish Caught still fire, for a game that would rather listen to events. An empty Seed Item Id or Fertilizer Item Id makes that use free even with an implementation, and the server’s Output Log warns of it once a player for each crop, and once for fertilizer.
Grow a crop of your own
A crop is a data asset naming its stages’ meshes, its seasons and what it yields. This makes a beet that grows in spring and autumn and is ready after four watered days.
- Make a static mesh for each stage, seedling to ready, with its pivot at the bottom centre and sized to stand on a tile (100 cm by default). A withered mesh is optional.
- In each mesh’s material, open Details > Usage, tick Used with Instanced Static Meshes and save the material. The fields draw crops as instances; without the tick, a packaged game shows them in the default grey.
-
In the Content Browser, right-click and pick Miscellaneous > Data Asset, choose Crop, and name it
DA_Crop_Beet. Open it.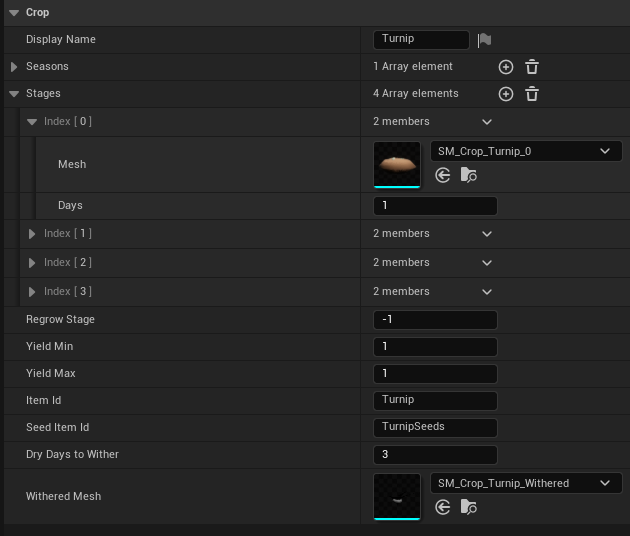
The sample turnip, laid out as your own crop will be. -
Fill it in:
Field Value Display Name BeetSeasons Spring and Autumn (click + for each) Stages three: the seedling’s mesh with Days 2, the half-grown mesh with Days2, the ready meshRegrow Stage -1, so a harvest clears the tileYield Min, Yield Max 1,2Item Id, Seed Item Id Beet,BeetSeeds - Save it. Saving checks it: a missing season or Item Id, fewer than two stages, Yield Max below Yield Min, or a Regrow Stage not before the last stage is an error in the Message Log, and a stage without a mesh, or an empty Seed Item Id, a warning.
- Give it to the player: add it to Player Seeds in the plugin’s settings, for the components the plugin adds, or at run time, on the server, to the Farmer Component’s Seeds array (when the player buys seeds, say).
A crop moves on to the next stage once it has had that stage’s Days of watered days, and is ready on the last stage, whose Days is unused. For a plant that gives again, such as a tomato, set Regrow Stage to the stage a harvest leaves it at.
Add fish of your own
A fish is a data asset; a Fish Table lists the fish of one kind of water and how often each bites. A Fishing Water uses one table.
-
Right-click in the Content Browser, pick Miscellaneous > Data Asset, choose Fish, and name it
DA_Fish_Eel. Open it.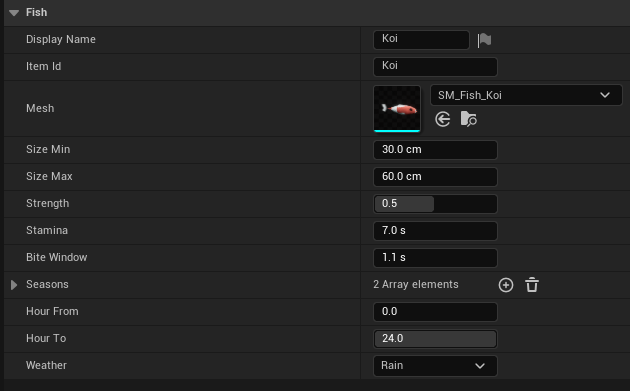
The sample koi: it bites only in rain, in spring and summer. - Set its Display Name, Item Id and Mesh, its size range in cm, and how it fights: Strength 0 to 1 is how hard it pulls, Stamina the seconds of reeling with the bar green it takes to tire, Bite Window the seconds you have to hook it.
- Set when it bites: its Seasons (none means all), the hours from Hour From up to
Hour To (
20to5runs over midnight; two equal hours never bite), and Weather: Any, Clear or Rain. -
Make the table: Miscellaneous > Data Asset > Fish Table, named
DA_FishTable_Marsh. Click + beside Entries for each fish, and give each a Weight: among the fish that can bite at the cast, one of weight 2 bites twice as often as one of weight 1, and one of weight 0 never. Min Wait and Max Wait are the seconds from the bobber landing to a bite.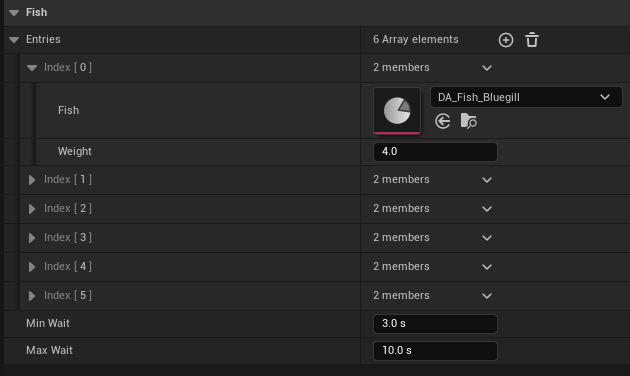
The sample pond’s table. - Select your Fishing Water and set its Fish Table to the new table.
Check it in Play with Fish.Table in the console: it lists each water’s fish and why any can’t
bite now (“Not in Winter”, “Only from 20 to 5”, “Only in the rain”, “Only in clear weather”).
Saving a fish or a table checks it too: a fish without an Item Id is an error in the Message
Log, and a table with no fish a warning. Saving the map checks each Fishing Water: one without a
table is an error, or a warning if it refills cans.
[!TIP] Give every table a fish that bites at any hour in every season, as the sample pond’s bluegill does. The fish is chosen at the cast: if none can bite then, the cast is refused with “Nothing bites here now”, which reads as a bug to a player.
Change the seasons and the speed of time
All in Project Settings > Plugins > Farming & Fishing, under Calendar:
| Setting | Default | For |
|---|---|---|
| Days Per Season | 28 | A shorter year: at 7, a season is a week. |
| Real Seconds Per Game Hour | 30 | A slower or faster day: at 30, a day lasts 12 minutes. |
| Start Hour | 6 | The hour a new game begins at. |
| Wake Hour | 6 | The hour Sleep Until Morning wakes to. |
| Rain Chance | 0.15 | How often a day outside winter is rainy. |
The calendar always begins on day 1 of spring, year 1. To start elsewhere, call Advance Time on the server when play begins, or load a saved farm.
Follow your own day and night
The calendar runs its own clock by default. A game with its own day and night cycle drives it instead, so the two never disagree.
- Set Real Seconds Per Game Hour to
0. The clock stands still, and Set Clock Running can’t start it. - Where your cycle moves time on, on the server, call Get Farm, then Advance Time with the game hours that passed; it never goes back. Each midnight passed starts a day: the weather is rolled, crops grow, the soil dries.
The other way round, to light your level from the farm’s clock:
- In your sky or lighting Blueprint, on Event Tick, call Get Farm and Get Hour.
- Set your directional light’s pitch to
(Hour - 6) * -15: on the horizon at 06:00, straight down at noon, set at 18:00.
The plugin draws no weather. Bind On Rain Changed on Get Farm to start and stop your rain effect, and On Season Changed to swap foliage, music or anything else by the season. The events fire only on a change: read Is Raining and Get Season as play begins too.
Sleep in a bed
- Give your bed an interaction of your own (an overlap, a key, a prompt).
- On the server, call Get Farm, then Sleep Until Morning. The clock moves to the Wake Hour: today’s if it is still earlier, otherwise the next day’s, so sleeping at the wake hour itself moves a whole day. Every midnight on the way starts a day.
From a client, call it through an event of your own set to Run on Server, on something the
client owns, such as its pawn or player controller. The plugin ships a bed mesh,
SM_Prop_Bed, among its props.
Show what the player can use
A Glint is a small sparkle on what the player can use. The plugin puts one on each patch of one crop ready to harvest, such as a row, and one on each Fishing Water; the demo’s bed carries one too.
- In the Blueprint of your bed, chest or other prop, click Add and search
Glint. - Move it to where it should shine. Set Range to the distance it should show from.
- When the thing can’t be used, call Set Glint On with it unticked; tick it again when it can.
A Fishing Water’s glint is its Glint component, over the box’s centre until you move it. Untick Glint On on one water whose glint you don’t want, and Ready Glints on a Farm Area for none over its crops. Glints in Project Settings > Plugins > Farming & Fishing turns them all off; in play, Set Glints Shown on Glints (the local player subsystem, from the player controller) does the same for one player, for an options menu.
Save and load the farm
The farm’s state is the calendar and every field’s tiles. Capture Farm returns it as one structure to keep in your save game; Restore Farm puts it back. Restore Farm runs on the server only: on a client it changes nothing and returns false. Capture Farm works on a client too, from what has replicated to it.
- In your SaveGame Blueprint, add a variable of type FFFarm Save (search
Farm Savein the type list). - When you save: call Capture Farm, set the variable from it, and save your save game as you already do.
- When you load: load your save game, then call Restore Farm with the variable. Call it once the level has begun play, for example after a Delay Until Next Tick in your game mode’s BeginPlay: fields not yet in the level are skipped. A field the save doesn’t name keeps the tiles it has.
A game without a save game of its own can call Save Farm To Slot and Load Farm From Slot with a slot name instead. Each returns whether it worked. Saving works anywhere; loading restores, so it runs on the server.
#include "FFLibrary.h"

// In your save game: UPROPERTY(SaveGame) FFFFarmSave Farm;
Save->Farm = UFFLibrary::CaptureFarm(this);
// ...and after loading it, on the server:
UFFLibrary::RestoreFarm(this, Save->Farm);
The player’s items and seeds are your inventory’s to save; the farm keeps neither the players’ cans and tools nor whether the clock was stopped. Fields match their saved tiles by Area Id, which is the actor’s name unless set: give a Farm Area spawned at run time an Area Id of its own. Crops are saved by reference, so a crop asset you rename keeps loading only through its redirector.
Play it in multiplayer
Nothing needs setting up: the server owns the calendar, the fields and the fishing, every player gets their own tools, and all of it replicates. The plugin adds the components on the server, to each pawn a player controller possesses.
- To try it, open the arrow beside Play, set Number of Players to
2and Net Mode to Play As Listen Server, and press Play. Both players see the same field; each has their own tool bar and can. - Console commands such as
Farm.Dayrun on the server: type them in the server’s window. - The nodes marked server only (Advance Time, Sleep Until Morning, Restore Farm, a Farm Area’s Till, Plant and the rest) do nothing on a client; Restore Farm returns false there. Call them from an event set to Run on Server. Capture Farm and Save Farm To Slot work on a client too.
- Add Farm Item and Consume Farm Item are called on the server: your inventory must replicate its own contents to the player.
- A Farmer Component’s Seeds set on the server reach its player, but its Tools list doesn’t replicate: change it on the server and on the owning client.
A dedicated server draws nothing: no soil, crops, tools or lines. The concepts say which event fires on which machine.
Make a tool of your own
The tool bar’s six tools are fixed, but a tool of your own is an input of yours calling a field’s nodes. This sprinkler waters the nine tiles around the one ahead:
- Make an input action
IA_Sprinkle, map it to a key in your mapping context, and handle it in your character Blueprint. - On it, get the Farmer Component (Get Component by Class) and call Get Target. It returns the Area, the tile’s Coord and the point aimed at, and false when no tile is targeted.
- Pass Area and Coord to a custom event set to Run on Server.
- In it, loop X and Y from
-1to1, make a point of Coord’s X plus X and Y plus Y (Make IntPoint), and call Water on Area with it.
Till, Plant, Fertilize, Harvest and Clear work the same, and each returns how it went, such as Done or Not Tilled.
To change only what the player holds, set a tool’s mesh in Tool Meshes in the plugin’s settings. To leave a tool out, such as the rod in a game without fishing, edit the Farmer Component’s Tools list. Its order is the keys’: Select Tool with index 0, or the key 1, picks the first.
Target from above or through the eyes
The Farmer Component’s Target Mode picks how the tile is chosen:
| Target Mode | For | Picks |
|---|---|---|
| In Front | third and first person | the tile Reach (120 cm) ahead of the pawn |
| Camera | first person | the tile the camera looks at |
| Cursor | top-down | the tile under the mouse cursor |
Every mode stops at Max Reach (350 cm) from the pawn. The server checks the distance again, to the tile’s centre, allowing one tile more: 450 cm by default. In Front finds the ground by its World Static collision; Camera and Cursor trace the Visibility channel. To change Max Reach for every player, add the components to your character yourself (next how-to) and set it there.
Use your own character, input and HUD
With Add To Players on, the plugin adds both components to every player’s pawn that has none. To set them up yourself:
- In your character Blueprint, click + Add in Components and add a Farmer Component and a Fishing Component. The plugin then uses yours, with their events ready to bind in the Details panel. Fill the Farmer Component’s Seeds: Player Seeds goes only to the components the plugin adds.
- Set Hand Socket on both to your skeleton’s hand socket (
hand_ron Epic’s mannequins), and adjust Tool Transform and Rod Transform in the plugin’s settings until the tools sit in the hand. - For your own input, untick the Farmer Component’s Default Input in its Details (Blueprint can’t change it at run time) and call Use Pressed, Use Released, Select Tool, Cycle Tool and Cycle Seed from your input events.
- For your own HUD, untick Show Hud, or restyle the plugin’s: make a Widget Blueprint whose
parent is Farm HUD, lay it out, and name its parts
DateText,ToolText,TargetText,MessageText,BiteText,BarTextandTensionBar; the HUD fills them in. Set it as Hud Class in the plugin’s settings, under UI.
The reference lists what each HUD part shows and the nodes to build your own.
Play your own animations
Each use is an action: Till, Plant, Water, Fertilize and Harvest on the field; Charge, Cast, Strike, Reel, Strain and Snap with the rod. On a skeleton with the UE5 mannequin’s bone names the plugin poses each one itself, over whatever your Anim Blueprint plays and with the feet kept where it puts them. To play your own instead:
- Make an Anim Montage for the action on your character’s skeleton, in a slot your Anim Blueprint’s AnimGraph plays (a Slot ‘DefaultSlot’ node before the output pose, for instance).
- In the Farmer Component’s Details, under Farming > Animation, add the action to Action Montages and pick the montage. The plugin’s own pose stops for that action, and with any montage there it no longer carries the tool in hand either (the arm out, the rod up): your Anim Blueprint holds it.
- Time it to Use Delay (0.35 s): a farm use changes the ground that long after it is pressed, so the hoe or the can should land then. Cast plays as the cast flies, Strike as a bite is struck, Snap as the line breaks. Charge, Reel and Strain last while they happen: make their montages loop. The plugin stops each when the next begins, and starts one once a montage played before it (the strike before the reel) has ended.
For an Anim Blueprint that animates on its own, untick Action Poses and bind On Action: it fires with each action as it begins, on every machine that shows the pawn, and with None when a held one ends. Play Action plays one yourself; Show (something lifted to the chest) and Stow (the left hand put away) are for your own code, as the demo farmer holds up her harvest and catch.