How-tos
The tasks buyers come back for, each answered in steps, Blueprint first and C++ after. They build on the quickstart’s village and the words in Concepts. Every node below is on the village: drag off a reference to it, or get one with Find Village, which returns the level’s first village, or the one under a location.
Lay a village along your own roads
A village grows its own roads from the middle. To give it yours:
- Make an actor with one or more Spline components (a Blueprint with a Spline, or any actor that has them) and draw your road with its points.
- Select the village and, in its Details, add an entry to Roads: set Actor to your spline actor, Width to the road’s width in cm (450 by default), and tick Main for a road through the village or untick it for a lane.
The village rebuilds along every spline of that actor: plots line both sides, doors to the road. The square is at the village actor’s own location, so put the actor where your roads meet. When you move a spline point, click Generate on the village to rebuild along the new line. The type’s Main Roads, Lanes and Bend apply only to grown roads.
Make a village type of your own
- In the Content Browser, find
DA_VG_Villageunder Plugins > Procedural Village Generator, right-click it and pick Duplicate. Move the copy into your own folder, say/Game/Village/DA_MyHamlet. - Open it and change what you like. For a hamlet: Radius
4500, Extent7000, Square Radius0(no square), Main Roads1, Lanes0, Fields3. -
Select the village and set its Type to your asset.
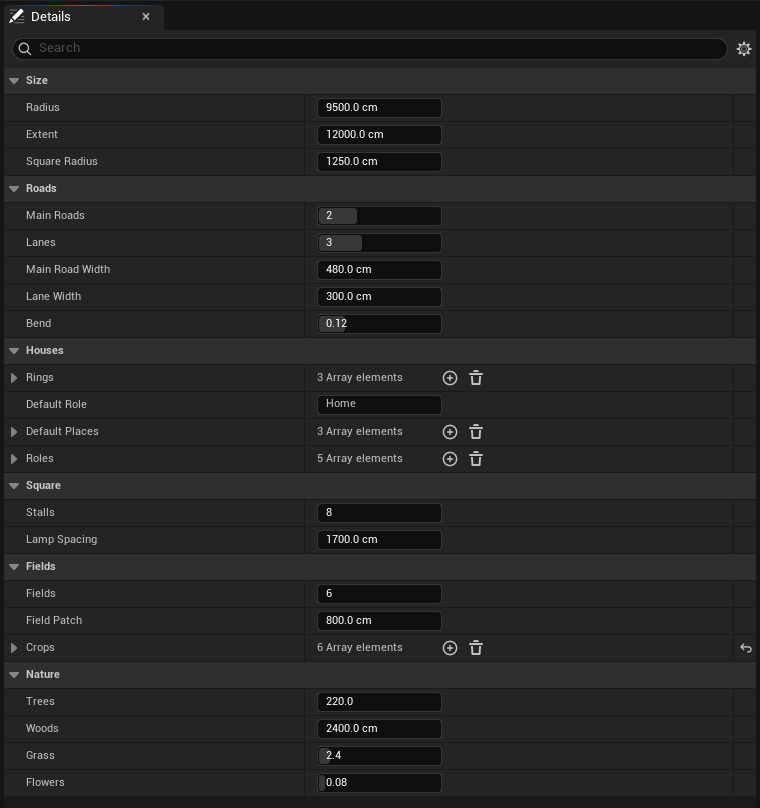
The default village type, DA_VG_Village.
Every field is in the reference. Data Validation checks a type as you save it: it says if Extent is less than Radius, or a ring lacks spans, walls, roofs or a module range.
Don’t change the plugin’s own DA_VG_Village: an update replaces it.
Add a kind of building
Each Roles entry of a type is a kind of building and how many the village has. To add a mill at the edge:
- In your type, add an entry to Roles and set Role to
Mill, Count to1, Where to Edge. - Give it places: add to its Places a
Workplace, Count2, Spot Inside, and aTradeplace at the Door. -
Leave Modules, Span, Storeys, Wall Styles and Roof at 0 or empty to take its ring’s, or set them: a mill of 4 modules, 2 storeys,
Stone.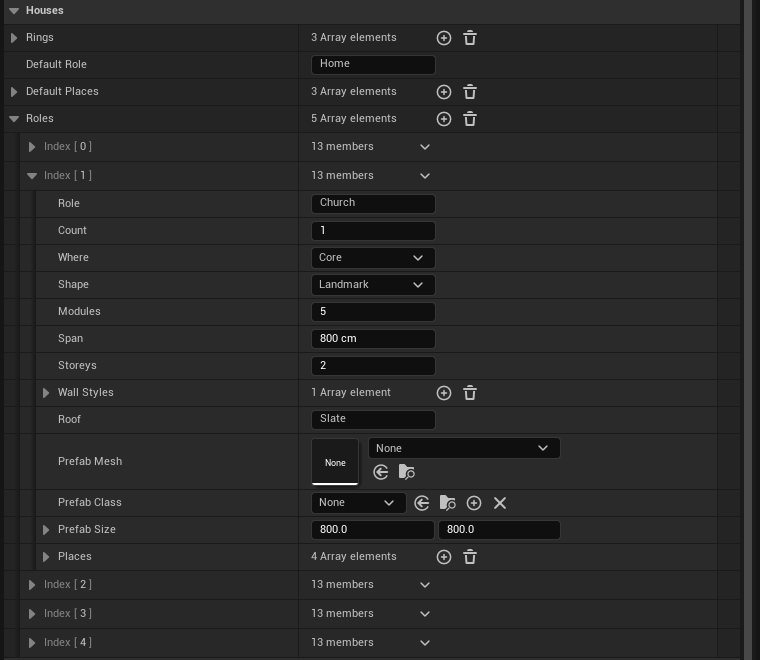
The church’s role: where it goes, its shape and size, and its places.
The roles are placed in their order, before the homes. A role that finds no free plot where it
belongs isn’t built for that seed: Village.Roles lists what a seed has.
Your own building. To use a whole mesh of yours in place of modules, set the role’s Prefab Mesh (its pivot on the ground at its middle, its front facing +X) and Prefab Size, its footprint. For a Blueprint, with lights, doors or a loot spawner, set Prefab Class instead: in play, the village spawns one per building and destroys them as it rebuilds. In the editor its footprint shows empty.
Give NPCs a home and a workplace
Get Home gives an actor a bed: the one it already holds, or the nearest free Sleep place, now claimed for it. Get Work Spot does the same for a Work place, at a building of the role you name, or at any.
- In your NPC’s Blueprint, on Begin Play, check Has Authority, then Find Village.
- Call Get Home with Self. If it returns true, keep its Place’s Transform: where to sleep, facing the way to lie.
- Call Get Work Spot with Self and a Role Name, such as
Farm, or none for any work.
A rebuild can renumber a held place: call Get Home or Get Work Spot again after On Generated rather than keeping its Index. To claim again when a rebuild drops a claim (Places), bind On Claim Lost: the new places are already there.
When the NPC is gone, Release All Places with it frees its bed and work. Find Places lists places of a kind, of a role, and only the free ones if you ask; Find Nearest Place finds the nearest of a kind, for a bench to sit on or a counter to trade at.
#include "VGLibrary.h"
#include "VGVillage.h"

void AMyVillager::BeginPlay()
{
    Super::BeginPlay();
    if (!HasAuthority())
    {
        return;
    }
    if (AVGVillage* Village = UVGLibrary::FindVillage(this, GetActorLocation(), true))
    {
        FVGPlace Bed, Work;
        if (Village->GetHome(this, Bed) && Village->GetWorkSpot(this, TEXT("Smithy"), Work))
        {
            HomeAt = Bed.Transform;
            WorkAt = Work.Transform;
        }
    }
}
Spawn actors in an area as play begins
Villagers in the village, deer in the meadow, a wolf in the woods:
- Select the village and, in its Details under Spawning, add an entry to Spawn Rules.
- Set Class to your actor, Area to an area’s name or kind (
Village,Meadow,Woods,Field 2…) and Count to how many.
As play begins, on the server, each rule spawns its actors at random points in the area, off the buildings and the roads, on the ground and turned at random. They’re spawned again from the same seed each time, so they start where they started last time. The village destroys them when it leaves play.
For more control, Random Point In Area gives one such point; pass a Random Seed for the
same point each time, or -1 for a new one.
Show what the player can use
A glint, a small sparkle, marks what the player can use once their view comes within its range.
- On a village’s places: add their kinds to the village’s Glint Places (
Readfor the notice board). Glint Offset sets where the glint sits before each. - On an actor of yours: Add > VG Glint in its components, and set its Range.
Set Glint On turns one off, for a chest once it’s opened. Village.Glints 0, or Set Glints Shown on the VG Glints subsystem, hides them all, for a setting of your game’s. To start with none, untick Glints in Project Settings > Plugins > Village Generator.
Know where the player is
Is In Area says whether a location is in an area of that name or kind; Get Areas At lists the names of every area at a location. For “Entering the village” or a market’s music:
- On a timer every half second, Get Areas At with the player pawn’s location.
- When it holds
Villageand didn’t last time, show your toast.
Distance To Road says how far a location is from the nearest road’s edge, negative on a road: for a horse that keeps to the road or a cart’s speed.
Move, pin or remove a building
Each of these rebuilds the village round the edit:
| Node | What it does |
|---|---|
| Pin Building (Id) | Keeps the building as it is, where it is, through every rebuild and seed. |
| Unpin Building (Id) | Lets it go back to the layout. |
| Move Building (Id, Transform) | Moves it, standing level on the ground there, and pins it. |
| Remove Building (Id) | Takes it away and keeps its ground clear. |
| Clear Edits | Forgets every edit. Also a button in the village’s Details. |
A building’s Id comes from Find Building At (a location, such as under a line trace from
the camera), Get Buildings Of Role or the village’s Buildings. Village.Debug 1 shows
each building’s role and Id.
Pin after you’ve picked the seed. A new seed lays new roads, and they don’t swerve round a pinned
building. Along your own roads, which stay put, you can pin
the inn (Get Buildings Of Role Inn, then Pin Building with its Id) and try seeds
round it: a pinned building counts towards its role, so no second inn is built.
Save a village and its edits
A village is its seed and its edits. Keep them in your save game:
- In your SaveGame Blueprint, add a variable of type VG Save Data.
- When saving: Make Save Data on the village into it.
- When loading: Apply Save Data on the village with it. The village rebuilds as it was saved.
Claims (who sleeps where) aren’t saved: make them again as your NPCs load.
Build a village during play
For a sandbox or a roguelite, a new village each run:
- Spawn Actor from Class with VG Village, at the spot you like, and set its Seed pin (and Type and Kit if you like). It builds once, as it begins play: by the time the node returns, its buildings and places are there to read.
- To keep the frame rate as it builds, tick the Async pin too: the layout runs on a background thread. Off the Spawn node’s Return Value, Bind Event to On Generated, and read its buildings and places in that event.
Set Seed on a village in play builds it again from another seed; Is Generating says an async build is under way.
Give it ground before it builds: the village reads the ground under it once, as it builds.
FActorSpawnParameters Params;
Params.bDeferConstruction = true;
AVGVillage* Village = GetWorld()->SpawnActor<AVGVillage>(AVGVillage::StaticClass(), Where, Params);
Village->Seed = FMath::Rand();
Village->bAsync = true;
Village->OnGenerated.AddDynamic(this, &AMyGameMode::OnVillageReady);
Village->FinishSpawning(Where);
Bake a village to actors
When a village is as you want it and you’d rather finish it by hand:
- Select the village and click Bake To Actors in its Details.
The village’s meshes become plain actors in a folder named <village>_Baked in the Outliner: one
per building, named by role and Id (VGVillage_Inn_3), and one per 64 m cell for the roads,
props, trees and grass. Move, delete or add to them as you like. World Partition streams them by
cell. The village stays, not drawn, so your game can still ask it for places and areas, though
these don’t follow what you move by hand.
Unbake deletes the baked actors and draws the village again. Your hand changes to them are lost.
Dress the village with PCG
Two nodes for a PCG graph of yours; search for Village in the graph’s node list:
- Village Points gives the nearest village’s buildings, places and, if you tick Roads, a point every Road Step along each road, as points with Kind, Role and Id attributes. Filter to one Role or Place Kind. A building’s point has its footprint’s box, a place’s faces the way one stands there.
- Village Clearance drops the points on a village’s roads, buildings, square and fields, with a Padding, so your scattered flowers, barrels or ruins keep off them.
For ivy on the houses: Village Points with Walls on, Buildings and Places off and
Openings Plain, then a Static Mesh Spawner. For flowers along their feet, the same with
Wall Out 40.
For barrels by every smithy: Village Points with Role Smithy and Places off, then a
Transform Points offset and a Static Mesh Spawner. For more trees in the meadow: Surface
Sampler on your landscape, Village Clearance, a Static Mesh Spawner.
With two villages in a level, give each an actor tag (Details > Actor > Tags) and set it as Village Tag on the nodes.
Ship a game with a village
A village builds in the packaged game as it does in the editor. The plugin adds its own village type and kit to the cook, and yours are cooked as the levels that use them reference them.
- In Project Settings > Maps & Modes, set Game Default Map to your level, and Editor Startup Map if you like.
- Package as usual (Platforms > Windows > Package Project).
In the packaged game, Village.Roles in the console lists the village, as in the editor.
Play it in multiplayer
Nothing to set up: place the village in the level, or spawn it on the server. Its seed and edits replicate, and each client builds the same village from them. Call Set Seed and the edit nodes on the server. Places are claimed on the server, where your NPCs decide.
Use it with heyheythere’s other plugins
Each takes a node or two; neither plugin needs the other.
- NPC Behavior & Daily Life System: villagers who live in the
village. On Begin Play of a level Blueprint or game mode, on the server, for each of the
village’s Find Places with Kind
Sleep,WorkandSit, Spawn Actor NL Spot at its Transform and set its Kind toNPC.Spot.Sleep,NPC.Spot.WorkorNPC.Spot.Sit.Gatherplaces make goodNPC.Spot.Talkspots. Then give the village a Spawn Rule of your NL Character Blueprint in theVillage. Inside places are behind shut doors; use only the outdoor ones, or let your NPCs fade at the door. - Farming & Fishing System: farm the village’s fields. For each area
of Kind
Fieldin the village’s Areas, Spawn Actor Farm Area at its Center, turned by its Yaw, with its scale set so its box covers the field’s Extent, and its Area Id set to the field’s Name. - Quest & Dialogue System: quests on the notice board. Find
Places with Kind
Readand RoleSquaregives the board’s front: spawn there an actor of yours with a Speaker Component whose dialogue offers the village’s quests. - World Map, Minimap & Compass System: the village discovered on
the map. Place a Map Area over the village (
Village.Debug 1shows its circle) and set its Display Name. For a village spawned in play, spawn the Map Area at theVillagearea’s Center and scale it to its radius. - RPG Skill Tree & XP System: XP for finding the village.
The first time Is In Area
Villageholds for the player’s pawn, on the server, Get Progression Component and Add XP. - GAS Ability & Status Effect System: rest in the village. While Is In Area
Squareholds for the player, Apply Status a regeneration effect of yours on them.